User Guide
- Introduction9
- Quick Start10
- Command Reference11
- Notes regarding command format
- Entering in dates
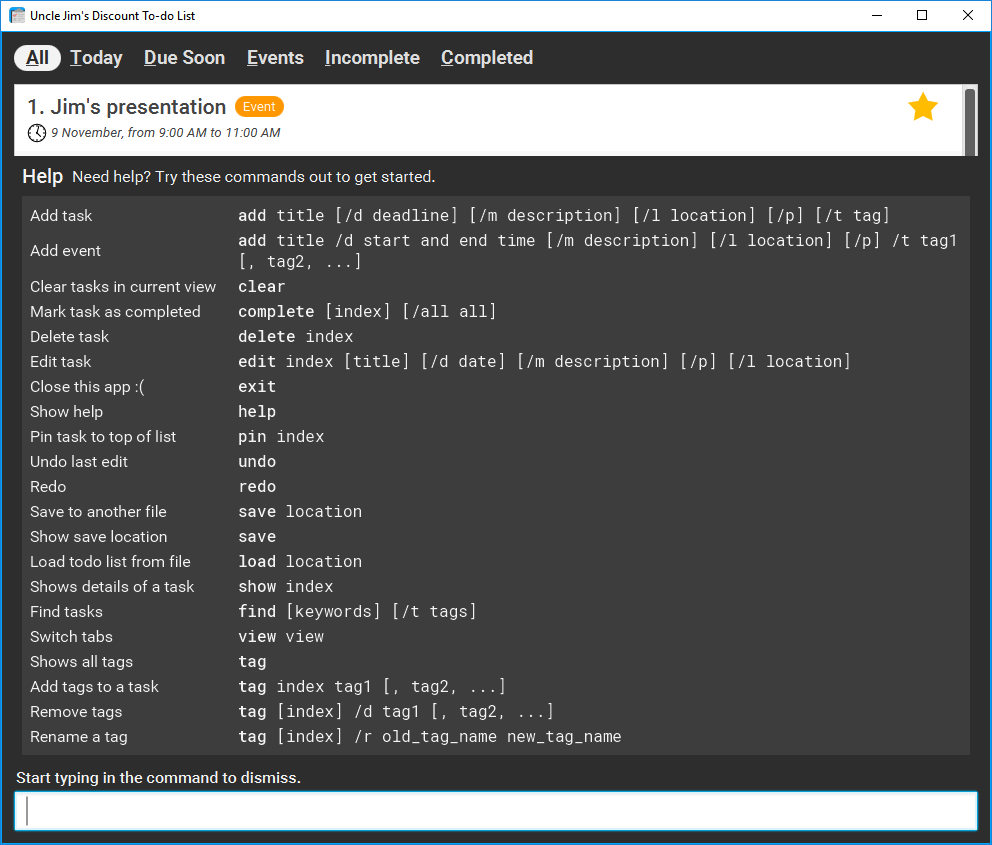
- Viewing help: help
- Deleting a task: delete
- Marking a task complete: complete
- Clearing tasks: clear
- Pinning a task: pin
- Editing a task: edit
- Managing tags: tag
- Showing details of a task: show
- Switching views: view
- Finding tasks: find
- Exiting the app: exit
- Undoing an action: undo
- Redoing an action: redo
- Loading an existing data file: load
- Changing the save location: save
- Other Features22
- FAQ24
- Command Summary35
1 Introduction#
In today's hectic society, our lives feel like a never-ending procession of tasks, deadlines, events and anniversaries to keep up with. Tracking these daily activities on a to-do list can be daunting. Many task management applications today have too many buttons that you have to click through just to add a task, and user interfaces that are so cumbersome it is hard for you to make it a habit to use.
Ever wished for a tool that can manage all your daily activities in distinct categories, and suggest to you which one you want to complete first? Well, look no further as Uncle Jim's Discount To-do List is here to save your day.
Uncle Jim's Discount To-do List (Uncle Jim in short) is a revolutionary mouse-free personal task manager that helps you to keep track of your daily activities through the power of your keyboard. Gone are the days when you had to click through several pages of menus just to add a simple task to your schedule. Our command line interface is not only flexible but remarkably easy to use. Just type the command and hit enter!
Moreover, we know that you understand your activities better. So Uncle Jim allows you to create your very own categories to organise your activities. Uncle Jim is also capable of managing both tasks and events so you don't have to use two different applications to be productive. Our unique product will intelligently sieve out urgent deadlines and serve up reminders for you, so you will no longer overlook another significant activity.
Sounds exciting? Then let's get started!
2 Quick Start#
-
Ensure you have Java version 8 update 60 or later installed on your computer.
This application will not work with earlier versions of Java 8
-
Download the latest copy of
Uncle_Jim.jarfrom our releases page. - Save the file to the folder you want to use for this application.
-
Double-click the file to start the application. You should see something like this
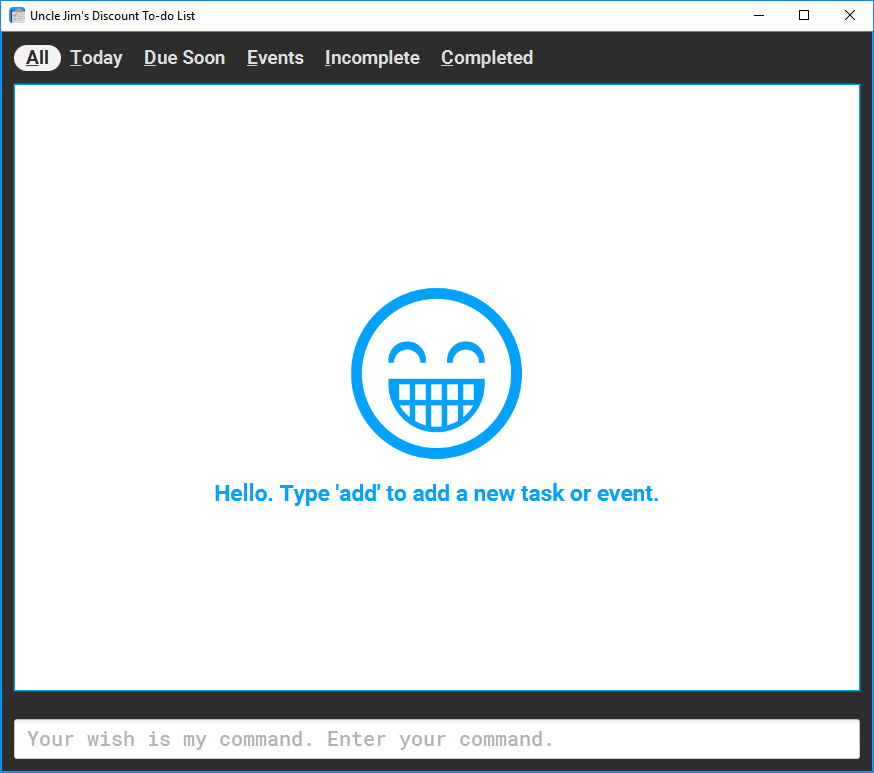
Figure 1. Initial launch screen of Uncle Jim -
Type in the command box and press Enter to execute it.
-
Here are some example commands you can try:
addFinish CS2103T homework /d next Friday- adds a new task with the deadline set for next Fridaydelete3- deletes the 3rd task shown in the current listexit- exits the app
-
Refer to the commands reference section below for details of each command.
3 Command Reference#
You can refer to the section below for the full list of commands that are available in Uncle Jim. For quick reference, you can also refer to the command summary at the end of this guide or use the help command when using the app.
3.1 Notes regarding command format#
- Words in
UPPERCASEare the parameters. - Items in
[SQUARE BRACKETS]are optional. - To specify parameters, such as the deadline for a task, use flags. Flags follow the Windows DOS command format - single dash (eg.
/f) for short flags. - Items with
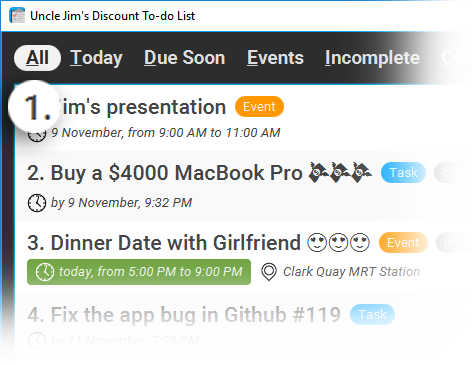
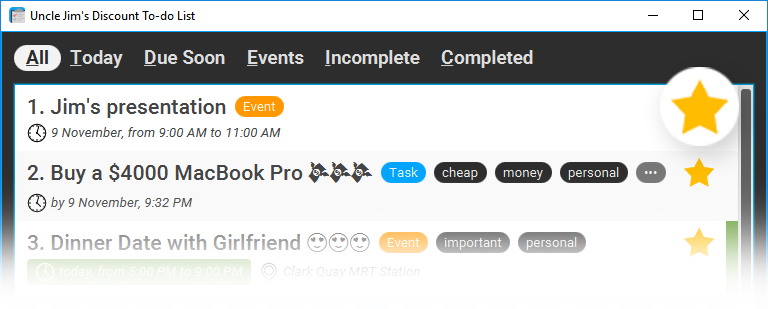
...within each parameter means you can add more items within the same parameters than specified. - Most commands that refer to a particular task or event in the list require an
INDEX. This is a number indicated on the left of a task or event as shown in the screenshot below:
3.2 Entering in dates#
Uncle Jim supports flexible date formats so you can enter dates in the formats specified below:
-
Formal dates
Dates in a standard numerical form such as DDMMYYYY or DD/MM/YY.
Example
1978-01-28
29/10/94 -
Relaxed dates
It is not always necessary to write it in full formal date formats - Uncle Jim allows relaxed date formats as well. If you don't include the full date, we will use the current month or year
!!! example
    Oct 12 9pm
    9 May
-
Relative dates
We also understand days of the week and even relative date and time.
Example
next Thursday
tomorrow evening
in two days
Note
If no time is specified when entering a date, Uncle Jim will use the current time by default
3.3 Viewing help: help#
Format: help
Help allows you to have a quick reference of the commands in case you forgot the format to follow.
3.3.1 Adding a task or event: add#
Format:
addTASK NAME [/d DEADLINE] [/m DESCRIPTION] [/p] [/t TAG 1, TAG 2...]
addEVENT NAME /d START END [/m DESCRIPTION] [/l LOCATION] [/p] [/t TAG 1, TAG 2...]
You can add new tasks or events to the To-do List using the add command.
Although the list of parameters above looks intimidating, all of them except the name of the task are optional. Tasks will be turned into events automatically if there are two dates specified under the /d flag.
Here are some common scenarios where you would use the various parameters:
3.3.2 Adding a task#
You can add a task by simply giving a name.
Example
addFinish up developer guide for CS2101
Note
Try to keep titles short. If you need more details, do put them in the description.
3.3.3 Adding an event#
You can add events by specifying a start time and end time with the /d flag. Event locations can be specified by adding them with the /l flag.
Example
addMusic at the park /d 11 Dec 6pm to 8pm /l Botanic Gardens /p
3.3.4 Adding a deadline#
If you need something done by a specific time, add a deadline to your task by specifying a single date and time with the /d flag.
Example
addSubmit Project Proposal V0.0 /d 5 Oct 2359
3.3.5 Adding descriptions to a task#
If you need to add more details to a task, you can add them under the /m flag. Note that these descriptions will be hidden from default view, once the task is added. To learn how to see these details again refer to the show command.
Example
addDestroy the Earth /m Going to need a lot of TNT for this. Remember to get them on sale on Friday - 50% discount on bulk orders!
3.3.6 Pinning a task#
Have something you don't want to forget? These tasks or events can be pinned to the top of the list using the /p flag. See the pin command for more details.
Example
addMeet Li Kai at Friday Hacks! /d 21 Oct 6pm to 8pm /p
3.3.7 Organizing tasks using tags#
If you have a lot of tasks you can use tags to organize them. See the tag command for more detail.
Example
addFinish tutorial 6 /d 10 Oct /t CS2106, School
3.3.8 Parameter reference#
| Flag | Parameter | Used to |
|---|---|---|
/d |
DEADLINE |
Specify a deadline for the task |
/d |
START END |
Specify the start and end time for the event |
/m |
DESCRIPTION |
Add a long description to the task or event |
/l |
LOCATION |
Add a location to the event |
/p |
- | Pins the task to the top of the list |
/t |
TAG 1, TAG 2, ... |
Tags to help organize your tasks |
3.4 Deleting a task: delete#
Format: deleteINDEX
This allows you to delete the task specified by the INDEX parameter. The index refers to the index number shown in the current view.
Note
If you accidentally deleted the wrong task, not to worry! You can undo the action later on. See the undo command for more information.
Example
delete2- Deletes the 2nd task on the list
findY2S1delete1- Deletes the 1st task in the results of the
findY2S1command.
3.5 Marking a task complete: complete#
Format:
completeINDEX
complete/all
After finishing a task, you can mark it complete by specifying the index of the task you wish to mark complete in the INDEX parameter. Completed tasks have their title struckthrough.
If you wish to mark a batch of task in the current view as complete, you can use the /all flag to mark them all as complete.

Note that this is a toggle command, so if the specified task is already completed, running this will mark the task as incomplete again.
3.6 Clearing tasks: clear#
Format:
clear
If you start to have a lot of completed tasks building up, you can clear the clutter by deleting all of them with clear. Note that this only clears completed tasks in the current view.
3.7 Pinning a task: pin#
Format: pinINDEX
If a particular task or event is important, you can pin it to the top of every list the item appears in using this command. You can also use this command to unpin any pinned task.
3.8 Editing a task: edit#
Format:
editINDEX [NAME] [/d DEADLINE] [/m DESCRIPTION] [/r TIME] [/p]
editINDEX [NAME] [/d START END] [/m DESCRIPTION] [/l LOCATION] [/p]
You can edit tasks or events using the edit command. This command accepts the same parameters as the add command with the addition of INDEX, which specifies which task or event you want to edit.
Note that edits are automatically saved, and any errors can be undone using undo.
3.9 Managing tags: tag#
Format:
tag
tagINDEX TAG1, TAG2, ...
tag[INDEX] /r OLD NEW
tag[INDEX] /d TAG
You can use tags to organize your tasks easily. Each task may have up to 5 tags. Tags are alpha-numeric and case-insensitive, and you can use hyphens "-" and underscores "_" in your tags too. You can use the tag command to add, edit or delete tags from one or all of the tasks. Here are some of the examples of what you can do with the tag command:
3.9.1 Viewing all tags used so far#
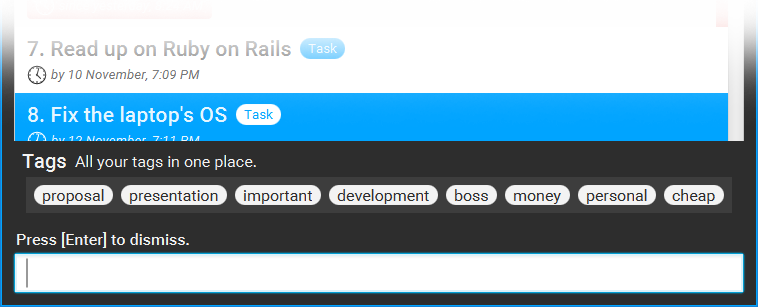
Sometimes you might not want to reuse tags you have used for other tasks previously. To check what tags are already used, simply type tag with no flags, and Uncle Jim will show you all tags that are used in the app.
3.9.2 Adding tags to a task#
If you wish to add tags to a task, simply type tag with the INDEX and the tag names you wish to add to a task. This does not overwrite any existing tags on a task:
Example
tag1 cs2103T- Adds the
cs2103Ttag to the first task on the list
3.9.3 Editing tags#
You can rename tags for either a single task, or all tasks using /r:
Example
tag/r Business Pleasure- Renames the
Businesstag toPleasure tag1 /r Business Pleasure- Renames the
Businesstag toPleasureonly in task 1.
Note
Note that without the INDEX parameter, doing this will affect all tasks tagged with the specified tag, such as Business in the example above.
3.9.4 Deleting tags#
You can also remove a tag from either a single task, or all tasks at once with /d:
Example
tag1 /d important- Removes the
importanttag from the first task tag/d important- Removes the
importanttag from all tasks. Remember you can alwaysundoif you make a mistake.
Keep it simple!
Tags are only really necessary if you have a lot of tasks. Uncle Jim works just as well even if you don't use tags. For maximum productivity, keep your tags short and simple, and keep them broad so that you can apply them to many tasks. In this manner, we have imposed a maximum of five tags per task.
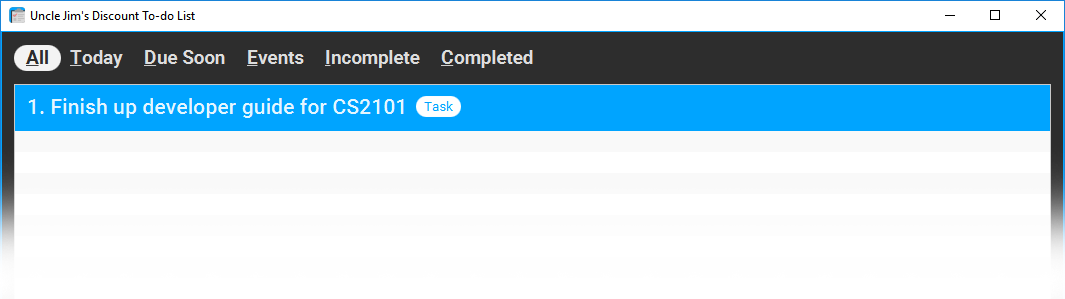
3.10 Showing details of a task: show#
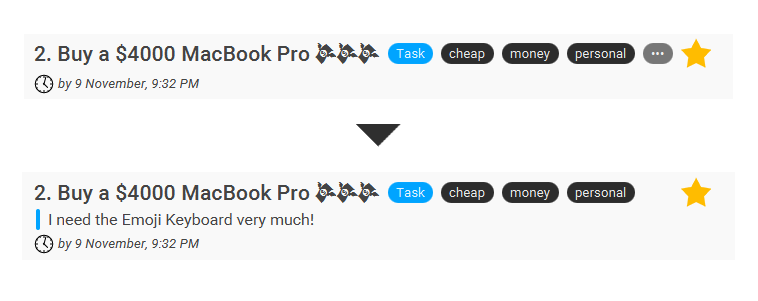
Format: showINDEX
Descriptions of tasks and events are hidden by default. In order to display them, you can use this command to toggle between the expanded version of a task and its compact form, as shown below:
3.11 Switching views: view#
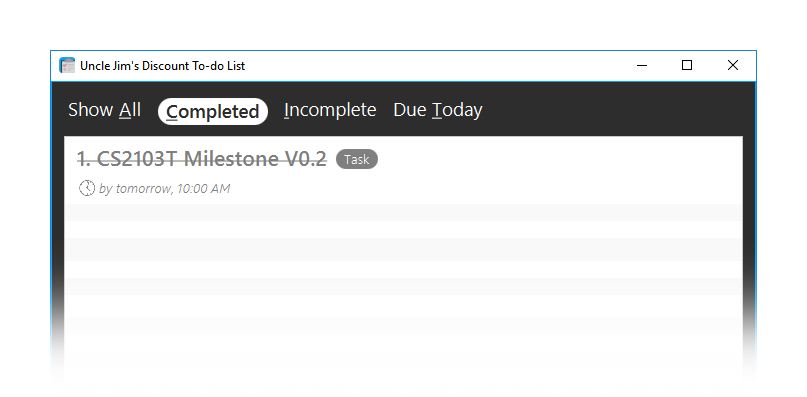
Format: viewVIEW
You can drill down into your To-do List and see specific tasks, such as your incomplete tasks or today's schedule, using the view command:
Example
viewcompleted- Show completed tasks only
You can also use the underlined character in the view's name as the shortcut when switching views.
Example
viewi- Show incomplete tasks only, since
iis the underlined character as shown in the image above.
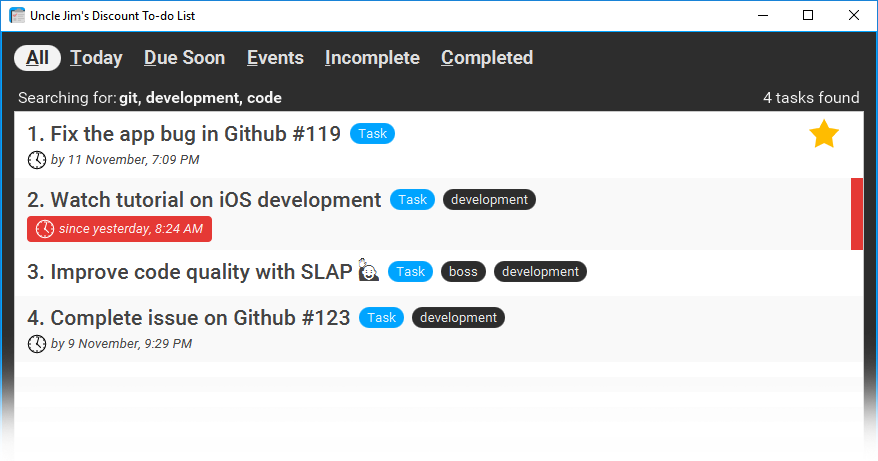
3.12 Finding tasks: find#
Format: findKEYWORD [MORE KEYWORDS] [/t TAGS]
You can search for tasks using the find command. The search is case insensitive and the order of the keywords does not matter. Add the /t flag allows you to specifically search for those tags.
Note
Keywords are separated by spaces, not comma
Example
findGithub- Returns tasks with Fix Github Issue #119
find/t code- Returns any task tagged with code in the tags
findgit development code- Returns any task with either git, development, or code in the title, such as Fix the app bug in Github #119, Watch Tutorial on iOS development, Improve code quality with SLAP and so on and so forth.
3.13 Exiting the app: exit#
Format: exit
If you wish to exit the program, simply type exit.
3.14 Undoing an action: undo#
Format: undo
If you make any mistake, simply typing undo to undo your last action.
Note
Only applies to commands which have made changes to the To-do list like add, edit and delete
3.15 Redoing an action: redo#
Format: redo
Similar to the undo command, you can redo your most recent action that you revoked as well.
3.16 Loading an existing data file: load#
Format: loadFILENAME
You can use load to load another .xml file into the application. This can be used to restore a backup or switch to different lists. You can also use this to manage different To-do lists, such as having one for home and another for work.
Example
loadmyDiscountTodo.xml
3.17 Changing the save location: save#
Format: save[FILENAME]
By default, to-do list data are saved in a file called discountTodo.xml in the data folder. You can change the save file by specifying the file path as the first argument when running the program, or by using the save command.
The save command will show you the location of the current save file if you use it without specifying a FILENAME.
Autosave
Your to-do list is saved automatically every time it is updated. There is no need to save manually after each edit.
Our user interface is very interactive and features a lot of visual feedback to the user. For example, for commands such as add, edit and show, you can see upon which task your action acts upon by viewing which task is highlighted.
Also, Uncle Jim distinguishes between tasks and events, not only by different tag colors but by also handling them differently. For example, if you have a task that is overdue, Uncle Jim will instantly highlight it red.
For events which are ongoing, they will be highlighted green.
For events which have passed, they will be faded, but we leave it to you to mark the events complete.
4.2 Intelligent Command™#
As you get more advanced with Uncle Jim, you might find typing the full command slightly cumbersome. To speed up your workflow you can type our just the first few characters of a command, because our Intelligent Command™ system can recognise commands even if you do not type them out fully.
Example
com1- Marks the first task on the current list as complete. Our system recognises it as the complete command
If the commands are ambiguous, our system will ask you for clarification of which command you wish to execute.
For example, typing just e could refer to edit or exit so a message as shown below will be displayed to you.

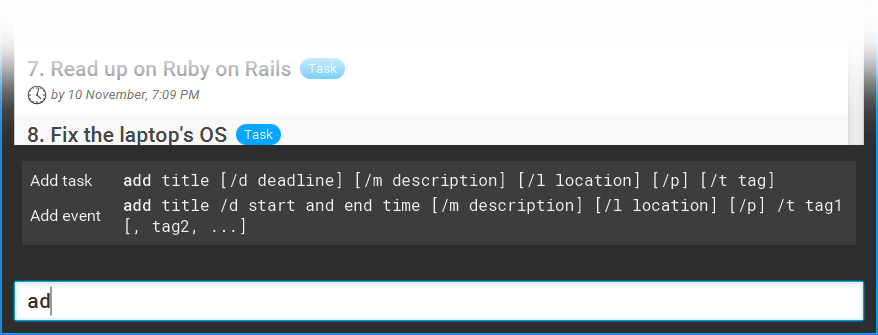
4.3 Command Preview™#
We also understand that it takes time for new users to remember all the commands. As such, we have a CommandPreview™ which tells you the parameters of the command you have to enter. For example, if you type ad the system will process your keystrokes and display to you what commands it thinks you are going to execute and displays them as shown below:
5 FAQ#
Q: Is my data secure?
A: Your data is stored locally on your hard drive. So, your data is as secure as your hard drive. We do not have access to your To-do list.
Q: How do I back up my data?
A: As your data is saved to the file that you specified, you can simply copy this file to a back up storage of your choice.
Q: How do I sync my data with multiple devices?
A: Simply load the file to a cloud sync service like Dropbox or Google Drive, and all updates will be reflected automatically to all devices using the file.
Q: How do I pay for this project?
A: Donations can be made via PayPal or Kashmi. Cash donations are fine too. Basically if you wish to donate we will find a way for us to receive your money.
6 Command Summary#
| Command | Format |
|---|---|
| Help | help |
| Add | addNAME [/d DEADLINE or START END] [/m DESCRIPTION] [/p] [/t TAG 1, TAG 2...] |
| Clear | clear |
| Delete | deleteINDEX |
| Complete | completeINDEX or /all |
| Pin | pinINDEX |
| Show | showINDEX |
| Edit | editINDEX [NAME] [/d DEADLINE or START END] [/m DESCRIPTION] [/p] |
| Tag | tagINDEX TAG 1, [TAG 2...] or [INDEX] /r OLD NEW or [INDEX] /d TAG |
| Find | findKEYWORD [MORE KEYWORDS...] or /t TAG [MORE TAGS ...] or both |
| Undo | undo |
| Redo | redo |
| Load | loadFILENAME |
| Save | save[FILENAME] |
| View | viewVIEW |