Developer Guide
1 Introduction#
Welcome to the Uncle Jim's Discount To-do App!
This guide will teach you how to set up your development environment, explain the basic architecture of the application, teach you how to perform some common development tasks, as well as provide contact information for the times when you require additional help.
It also provides you with the tools for you to contribute further to this project in te spirit of open source software.
We hope you enjoy working with our product!
1.1 Tooling#
This project uses:
- Git - Version control
- Eclipse - IDE
- Gradle - Build automation
- Travis, Coveralls and Codacy - Continuous integration and quality control
- GitHub - Source code hosting and issue tracking
- Git client If you are using Linux, you should already have one installed on your command line. If you are using Windows or OS X you can use SourceTree if you are more comfortable with using a GUI.
- JDK 1.8.0_60 or later Please use Oracle's jdk because it comes with JavaFX, which is needed for developing the application's UI.
- Eclipse IDE
- e(fx)clipse plugin for Eclipse Perform steps 2 onwards as listed in this page to install the plugin.
- Buildship Gradle Integration plugin from the Eclipse Marketplace
You can find Eclipse Marketplace from Eclipse's
Helptoolbar.
2.1.1 Importing the project into Eclipse#
Note
Ensure that you have installed the e(fx)clipse and buildship plugins as listed in the prerequisites above.
- Click
File>Import - Click
Gradle>Gradle Project>Next>Next - Click
Browse, then locate the project's directory - Click
Finish
Note
- If you are asked whether to 'keep' or 'overwrite' config files, choose to 'keep'.
- Depending on your connection speed and server load, this step may take up to 30 minutes to finish (This is because Gradle downloads library files from servers during the project set up process)
- If Eclipse has changed any settings files during the import process, you can discard those changes.
2.2 Contributing#
We use the feature branch git workflow. Thus when you are working on a task, please remember to assign the relevant issue to yourself on the issue tracker and branch off from master. When the task is completed, do remember to push the branch to GitHub and create a new pull request so that the integrator can review the code. For large features that impact multiple parts of the code it is best to open a new issue on the issue tracker so that the design of the code can be discussed first.
Test driven development is encouraged but not required. If possible, all of your incoming code should have 100% accompanying tests - Coveralls will fail any incoming pull request which causes coverage to fall.
2.3 Coding Style#
We use the Java coding standard found at https://oss-generic.github.io/process/codingstandards/coding-standards-java.html.
Now let us explore the architecture of Uncle Jim's Discount To-do App to help you understand how it works.
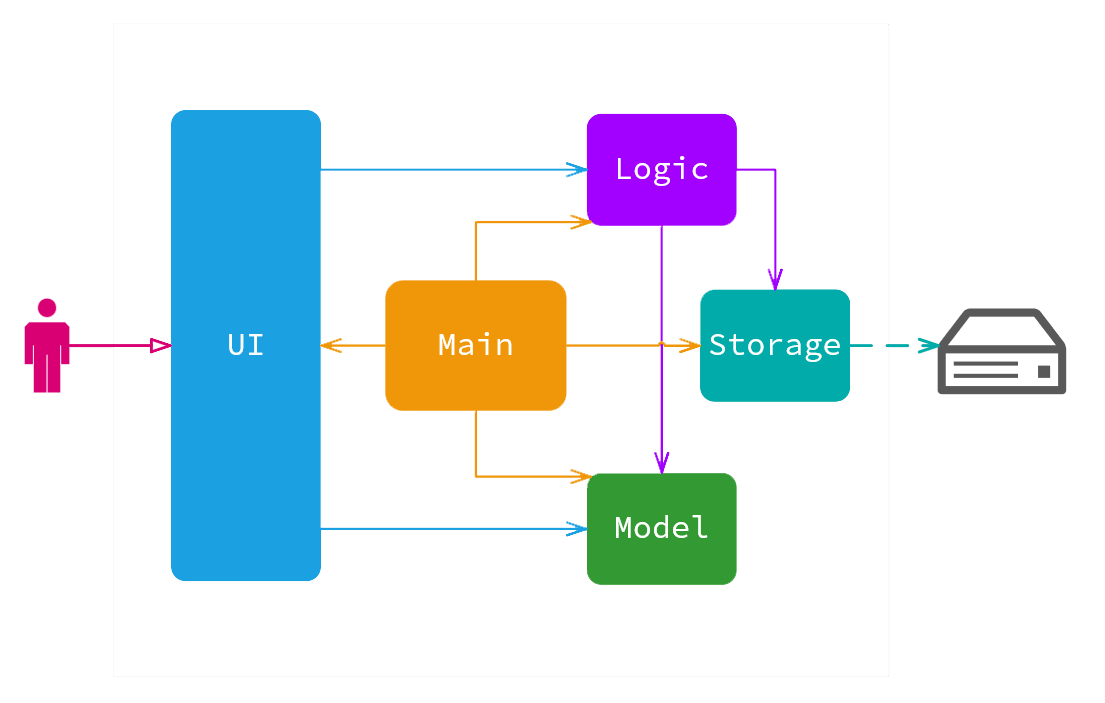
The architecture diagram above explains the high-level design of the application. Here is a quick overview of each component:
-
Mainhas only one class calledMainApp. It is responsible for:- Bootstrapping the application at app launch by initializing the components in the correct sequence and injecting the dependencies needed for each component.
- Shutting down the components and invoke cleanup method where necessary during shut down.
-
Commonsrepresents a collection of modules used by multiple other components UI: The user facing elements of tha App, representing the view layerLogic: The parser and command executer, representing the controllerModel: Data manipulation and storage, representing the model and data layer
The UI, Logic and Model components each define their API in an interface of the same name and is bootstrapped at launch by MainApp.
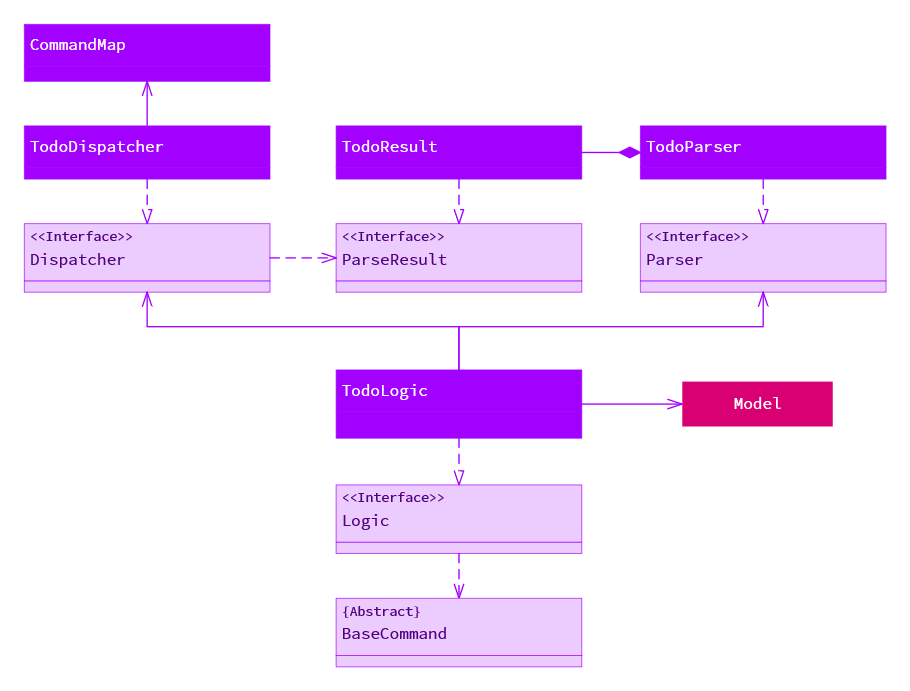
For example, the Logic component (see the class diagram given below) defines its API in the Logic.java interface and is implemented by TodoLogic.java class.

You can see how the components interact with each other when the user issues a command by looking at the above diagram.
The diagram below shows how the EventsCenter reacts to a help command event, where the UI does not know or contain any business side logic.

Event Driven Design
Note how the event is propagated through the EventsCenter to UI without Model having
to be coupled to either of them. This is an example of how this Event Driven approach helps us reduce direct
coupling between components.
The sections below will provide you with more details for each component.
3.2 UI component#
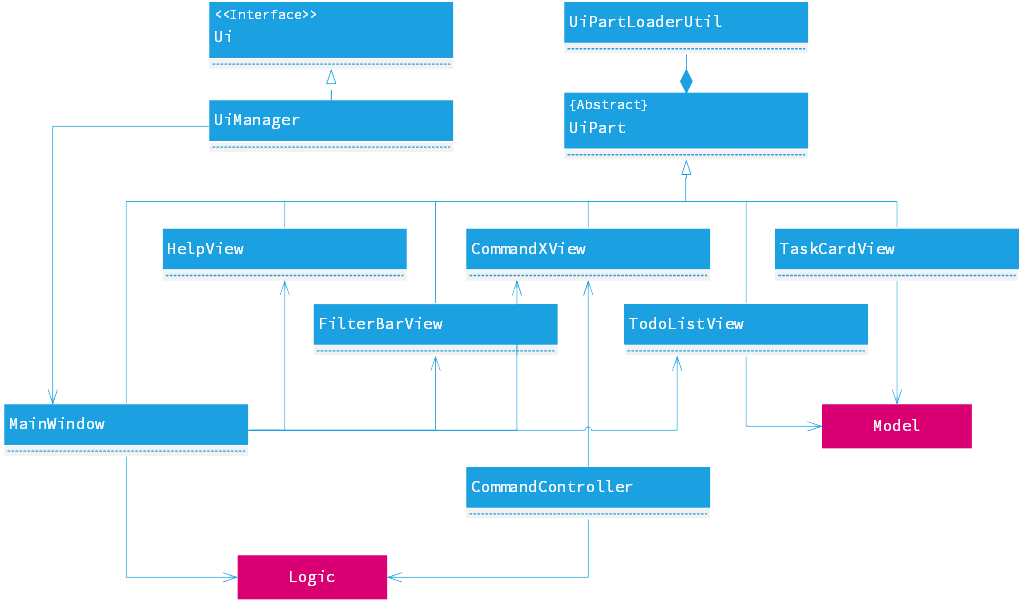
The UI component handles the interaction between the user and application. If you refer to the architecture diagram in the above sections, you will realise that the UI is responsible for passing the textual command input from the user to the Logic for execution, and displaying the outcome of the execution to the user via the GUI.
Some of the GUI view classes are shown in the UI components diagram above. You may also find the implementation for the GUI in the package seedu.todo.ui.

API : Ui.java
Referring to the diagram above, you may notice that the UI mainly consists of a MainWindow. This is where most of the interactions between the user and the application happen here. The MainWindow contains several major view elements that are discussed in greater detail below:
3.2.1 Command Line Interface#
The UI aims to imitate the Command Line Interface (CLI) closely by accepting textual commands from users, and displaying textual feedback back to the users. The CLI consists of:
CommandInputView- a text box for users to key in their commandsCommandPreviewView- a list of suggested commands from user inputsCommandFeedbackView- a single line text that provides a response to their commandsCommandErrorView- a detailed breakdown of any erroneous commands presented with a table
These view classes are represented by the CommandXView class in the UML diagram above.
The CommandController class is introduced to link the three classes together, so they can work and communicate with each other. The CommandController:
- Obtains a user-supplied command string from the
CommandInputView - Submits the command string to
Logicfor execution - Receives a
CommandResultfromLogicafter the execution - Displays the execution outcome via the
CommandResultto theCommandFeedbackViewandCommandErrorView
In the meantime, the CommandPreviewView listens to any user input through an event bus ShowPreviewEvent located in the UiManager and displays the suggested commands as required.
3.2.2 To-do List Display#
A to-do list provides a richer representation of the tasks than the CLI to the users. The To-do List Display consists of:
TodoListView- aListViewthat displays a list ofTaskCardTaskCardView- an item in theTodoListViewthat displays details of a specific taskEmptyListView- a view overlapping theTodoListViewwhich indicates that no task is displayed
Specifically, the TodoListView attaches an ObservableList of ImmutableTask from the Model and listens to any changes that are made to the ObservableList. If there are any modifications made, the TaskCard and TodoListView are updated automatically.
Also, the EmptyListView listens to the ObservableList of ImmutableTask if the list is empty. If the list is empty, the EmptyListView listens to the ObservableProperty of TaskViewFilter for the appropriate message to be displayed. You may try switching the views to see the messages yourself.
3.2.3 Additional Information#
The remaining view classes that are not mentioned are as follows:
FilterBarView- shows a list of available views users can switch to, and indicates the view that the user is currently atGlobalTagView- shows a global list of tagsHelpView- shows a list of commands that users can useSearchStatusView- shows the information regarding a search that user has performed
All these view classes, including the MainWindow, inherit from the abstract UiPart class. You may load these view classes using the utility class UiPartLoader.
The UI component uses JavaFX UI framework. The layout of these UI parts are defined in matching .fxml files that are in the src/main/resources/view folder. For example, the layout of the CommandInputView is specified in CommandInputView.fxml
Other than through CommandResult and ObservableList, you may also invoke changes to the GUI outside the scope of UI components by raising an event. UiManager will then call specific view elements to update the GUI accordingly. For example, you may show the HelpView by raising a ShowHelpPanel via the EventsCentre.
3.3 Logic component#
API : Logic.java
You can think of the logic component as the glue sitting between the UI and the data model, or as the controller in the traditional MVC pattern. All subcomponents in logic are stateless, which reduces complexity and makes it easier to reason about. Our application uses the thin controller/fat model design pattern, and therefore we delegate as much of the data manipulation and state handling to the model. Logic consists of three separate subcomponents, each of which also defines their API using interfaces or abstract classes:
Parser- turns user input into command and argumentsDispatcher- maps parser results to commandsCommand- validates arguments and execute command
When the Logic component is instantiated, each of these subcomponents is injected via dependency injection. This allows them to be tested more easily as the dependencies can be replaced with stub implementations.
The flow of a command being executed is:
Logicparses the user input into aParseResultobject- The
ParseResultis sent to the dispatcher which instantiates a newCommandobject representing the command the user called Logicbinds the model and arguments to theCommandobject and executes it- The command execution can affect the
Model(e.g. adding a person), and/or raise events.
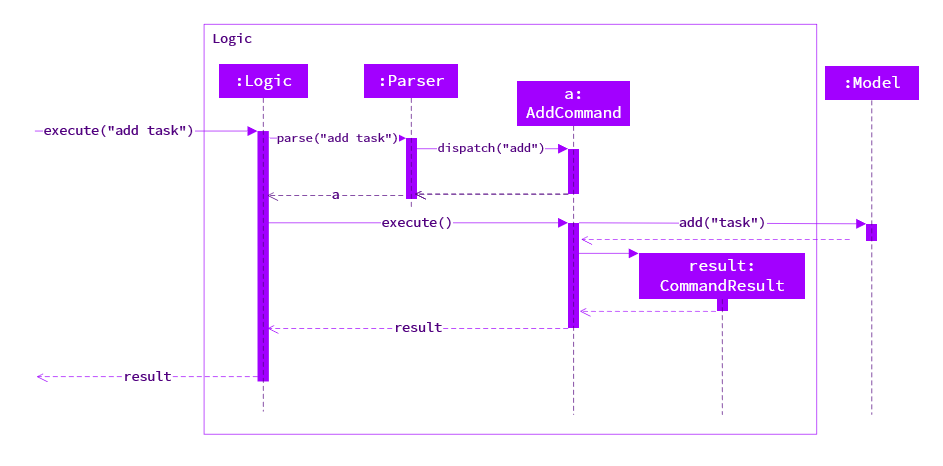
Given above is the Sequence Diagram for interactions within the Logic component for the execute("delete 1") API call. See the implementation section below for the implementation details of the logic component.
3.4 Model component#
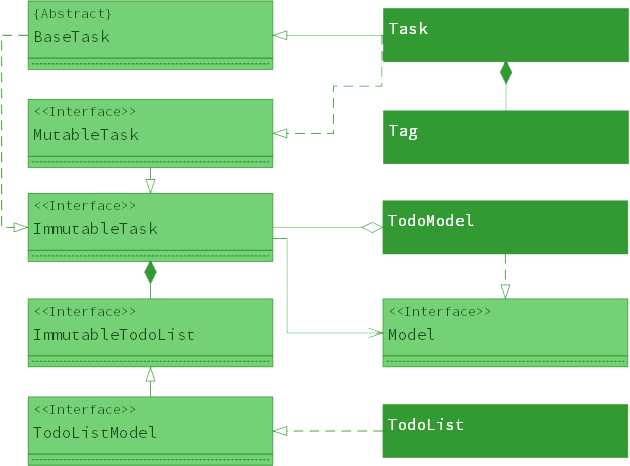
API : Model.java
The model component represents the application's state and data layer. It is implemented by TodoModel, which is a composite of of the individual data models for the application, as well as higher level information about the state of the application itself, such as the current view and the undo/redo stack. Model has two subcomponents:
TodoList- represents the todolist tasksUserPrefs- represents saved user preferences
Each individual data model handles their own CRUD operations, with the Model acting as a simplified and uniform interface for external components to work with. Each of the data model holds an injectable Storage object that exposes a simple interface for reading and writing to the appropriate storage mechanism.
To avoid tight coupling with the command classes, the model exposes only a small set of generic functions. The UI component binds to the model through a set of getters, such as getObservableList, which expose JavaFX Property objects that the UI can listen to for changes.
The model ensure safety by exposing as much of its internal state as possible as immutable objects using interfaces such as ImmutableTask.
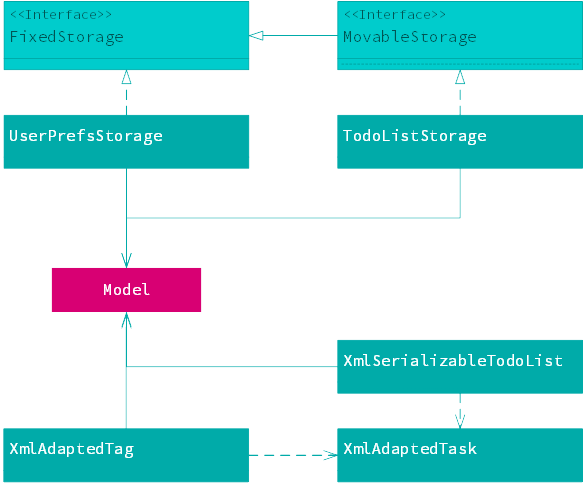
The storage component represents the persistence layer of the data. It is implemented by TodoListStorage which holds and contains ImmutableTodoList. Similarly, JsonUserPrefsStorage stores the user preferences.
Both classes implement FixedStorage, which exposes methods to read and save data from storage. Users can choose to move their storage file, hence MovableStorage is exposed to allow them to do so. User preferences cannot be exported.
3.5 Common modules#
Modules used by multiple components are in the seedu.todo.commons package.
3.5.1 Core#
The core module contains many important classes used throughout the application.
UnmodifiableObservableList: Used by the UI component to listen to changes to the data through the Observer pattern.Events: Used by components to marshal information around and inform other components that things have happened. (i.e. a form of Event Driven design)LogsCenter: Used by many classes to write log messages to the App's log file.
3.5.2 Util#
The util module contains many different helper methods and classes used throughout the application. The things that can, and should be reused can be found in here.
TimeUtil: Used by Ui to display time that is readable and user friendly.XmlUtil: Used by storage to save and read .xml files.
3.5.3 Exceptions#
The exceptions module contains all common exceptions that will be used and thrown throughout the application.
IllegalValueException: Used by Logic and Model internally to signal that a single value is invalidValidationException: Used by Logic and Model classes to signal that the command or model parsed is invalid.
See the Logic component architecture section for the high level overview of the Logic component.
4.1.1 Parser#
The TodoParser sub-component implements the Parser interface, which defines a single parse function that takes in the user input as a string and returns an object implementing the ParseResult interface. The implementing class for TodoParser can be found as an inner class inside TodoParser.
The parser tokenizes the user input by whitespace characters then splits it into three parts:
- Command
string- the first word of the user input - Positional argument
string- everything from the command to the first flag - Named argument
Map<String, String>- a map of flags to values
For example, the command add The Milk /d tomorrow 3pm /p will produce
command: "add"
positional: "The Milk"
named:
  d: "tomorrow 3pm"
  p: "" # Empty String
This is then passed on to the dispatcher.
4.1.2 Dispatcher#
The TodoDispatcher sub-component implements the Dispatcher interface, which defines a single dispatch function. The dispatch function simply tries to find the command that has a matching name to the user input, instantiates and returns a new instance of the command.
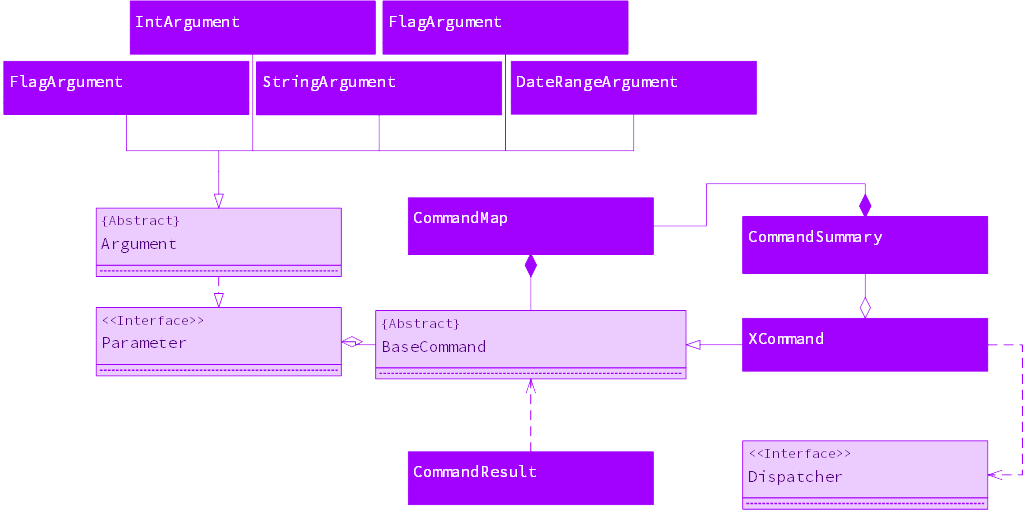
4.1.3 Command#
All commands implement the BaseCommand abstract class, which provides argument binding and validation. If any error were found at the
If you need to do additional argument validation, you can also override the validateArgument command, which is run after all arguments have been set.
4.1.4 Arguments#
Command arguments are defined using argument objects. Representing arguments as objects have several benefits - it makes them declarative, it allows argument parsing and validation code to be reused across multiple commands, and the fluent setter allows each individual property to be set independently of each other. The argument object's main job is to convert the user input from string into the type which the command object can use, as well as contain information about the argument that the program can show to the user.
The generic type T represents the return type of the command argument. To implement a new argument type, extend the abstract base class Argument, then implement the setValue function. Remember to call the super class's setValue function so that the required argument check works.
4.2 Model#
See the Model component architecture section for the high level overview of the Model and Storage components.
4.2.1 BaseTask#
The BaseTask is a simple abstract class to identify each task uniquely via Java's UUID class. Do note that this implementation means that two tasks with exact same content (fields) can be considered as two different tasks.
4.2.2 ImmutableTask#
This interface is used frequently to expose fields of a Task to external components. It prevents external components from having access to the setters.
4.2.3 Task#
A Task is a representation of a task or event in the todolist. Task inherits from BaseTask for a way to declare each task as unique. This object implements MutableTask which allows us to edit the fields.
4.2.4 ValidationTask#
A ValidationTask is a representation of a task or event in the todolist. This class allows us to verify the fields of the task, and check that they are valid, as the name implies. This class is used mainly for adding and updating a task, as Task is supposed to be immutable.
4.2.5 TodoList#
This class represents the todolist inside the memory and implements the TodoListModel. This interface is internal to Model and represents only CRUD operations to the todolist.
4.2.6 TodoModel#
This class represents the data layer of the application and implements the Model interface. The TodoModel handles any interaction with the application state that is not persisted, such as the view (sort and filtering), undo and redo commands.
4.2.7 ErrorBag#
The ErrorBag is a wrapper around errors produced while handling a command. To use the ErrorBag, simply create a new instance of it and put errors into it. At the end of the validation routine, call validate to let the bag throw a ValidationException if there are any.
4.2.8 FixedStorage#
This interface represents the persistence mechanism for a file whose location is cannot be set by the user. You can use this interface for storing preferences and other files which the user does not need to change the location for.
4.2.9 MovableStorage#
This interface enables us to declare a storage mechanism as movable. This means that the file path of the object can be changed when desired. The only class that implements this interface is TodoListStorage, as the configuration and user preference files have minimal impact and thus unimportant for the user.
4.2.10 TodoListStorage#
The main class that is exposed to the Model. In addition to reading and saving, methods are exposed to enable user to switch where the storage file is saved and read.
4.2.11 Xml Classes#
Classes prefixed with Xml are classes used to enable serialization of the Model. As the prefix suggests, the critical data is stored in the .xml file format and uses JAXB to read and save to the persistence layer. JAXB marshals Java primitives readily, however, if you wish to marshal any other classes, be it self-implemented or from a library, you would need to declare a XmlAdapter. See LocalDateTimeAdapter for reference.
4.3 Logging#
We are using the java.util.logging package for logging. The LogsCenter class is used to manage the logging levels and logging destinations.
- The logging level can be controlled using the
logLevelsetting in the configuration file (See Configuration) - The
Loggerfor a class can be obtained usingLogsCenter.getLogger(Class)which will log messages according to the specified logging level - Currently log messages are output through: Console and to a log file.
- The logs roll over at 5MB such that every log file is smaller than 5MB. Five log files are kept, after which the oldest will be deleted.
To use the logger in your code, simply include
private static final Logger logger = LogsCenter.getLogger(<YOUR CLASS>.class);
at the top of your class, and replace <YOUR CLASS> with the class the logger is used in.
4.3.1 Logging Levels#
| Level | Used for |
|---|---|
SEVERE |
Critical problem detected which may possibly cause the termination of the application |
WARNING |
Can continue, but with caution |
INFO |
Information showing the noteworthy actions by the App |
FINE |
Details that is not usually noteworthy but may be useful in debugging e.g. print the actual list instead of just its size |
4.4 Configuration#
Certain properties of the application can be controlled (e.g App name, logging level) through the configuration file (default: config.json)
5 Testing#
Tests can be found in the ./src/test/java folder.
5.1 In Eclipse#
- To run all tests, right-click on the
src/test/javafolder and chooseRun as>JUnit Test - To run a subset of tests, you can right-click on a test package, test class, or a test and choose to run as a JUnit test.
Note
If you are not using a recent Eclipse version (Neon or later), enable assertions in JUnit tests as described in this Stack Overflow question (url: http://stackoverflow.com/questions/2522897/eclipse-junit-ea-vm-option).
5.2 Using Gradle#
See UsingGradle.md for how to run tests using Gradle.
We have two types of tests:
-
GUI Tests - These are System Tests that test the entire App by simulating user actions on the GUI. These are in the
guitestspackage. -
Non-GUI Tests - These are tests not involving the GUI. They include,
- Unit tests - targeting the lowest level methods/classes.
e.g.seedu.todo.commons.UrlUtilTest - Integration tests - that are checking the integration of multiple code units (those code units are assumed to be working).
e.g.seedu.todo.model.TodoModelTest - Hybrids of unit and integration tests. These tests are checking multiple code units as well as how the are connected together.
e.g.seedu.todo.logic.BaseCommandTest
- Unit tests - targeting the lowest level methods/classes.
5.3 Command Tests#
To write tests for commands,
5.4 Task Builder#
To create tasks quickly, you can use the TaskBuilder class to quickly create ImmutableTask objects. An additional benefit of the using the TaskBuilder is that the creation time of consecutively constructed task objects will be set one second apart - if you try to use the Task constructor you may get tasks created on the same millisecond, which will cause problems with sorting.
5.5 Task Factory#
To generate a lot of tasks all at once, you can use the TaskFactory class to get a large number of randomly generated tasks. Use this class instead of TaskBuilder if fine control over the content of each task is not needed, for instance when testing out storage or conducting GUI testing.
5.6 GUI Testing#
As briefly described above, our GUI tests are System Tests. We crafted our GUI tests such that we are able to test every component of the application and the interactions between each component. This is done through the simulation of the user actions on the GUI itself. You may run these GUI tests in the package guitests to see the simulation in real life.
5.6.1 Structure#
If you look inside the guitests package, you may realise that we have grouped our test script files into two major locations:
guitests- the actual test script that contains sequences of user actionsguitests.guihandles- view handles that provide direct access to the contents of the displayed view elements
5.6.2 Creating GUI Handles#
When you create a new view for your GUI, you may want to create a handle for your newly created view. Simply extend your view handle from GuiHandle class, and you may start working on your view handle.
The GuiHandle class allows you to search for your view elements by their id, and you may retrieve the contents of the view element just like how you do so for any JavaFX view nodes.
You may view sample codes from handles such as TaskCardViewHandle and CommandErrorViewHandle in the guitests.guihandles package.
5.6.3 Creating GUI Tests#
When you want to write an automated test script for simulating user actions, you may do so with a JUnit test files. You may refer to examples such as AddCommandTest and DeleteCommandTest located in the guitests package.
All our GUI JUnit tests are inherited from TodoListGuiTest. The TodoListGuiTest class provides useful methods based on the TestFX library that makes automation easier. You may refer to the TestFX documentation for more details.
5.6.4 Headless GUI Testing#
Thanks to the TestFX library we use, our GUI tests can be run in the headless mode. In the headless mode, GUI tests do not show up on the screen. That means the developer can do other things on the Computer while the tests are running.
See UsingGradle.md to learn how to run tests in headless mode.
We use Gradle for build automation. Gradle handles project dependencies, build tasks and testing. If you have configured Eclipse by importing the project as shown in the setting up section Gradle should already be properly configured and can be executing from within Eclipse to build, test and package the project from the Run menu.
See the appendix Using Gradle for all of the details and Gradle commands.
6.2 Continuous Integration#
We use Travis CI to perform Continuous Integration on our projects. See UsingTravis.md for more details.
6.3 Making a Release#
Here are the steps to create a new release.
- Update the
Versionnumber inMainApp.java - Generate a JAR file using Gradle
- Tag the repo with the version number. e.g.
v0.1 - Crete a new release using GitHub and upload the JAR file you created
- Update
READMEto link to the new release
6.4 Managing Dependencies#
Our project depends on a number of third-party libraries. We use Gradle to automate our dependency management.
To add a new dependency, look for instructions on the project's documentation for Gradle configuration required. For most projects it will look something like this:
// https://mvnrepository.com/artifact/org.mockito/mockito-all
compile group: 'org.mockito', name: 'mockito-all', version: '2.0.2-beta'
This should be copied into the dependencies section of the build.gradle file. If you wish to, you can split the version string out so that the shorter compile property can be used instead, but this is not strictly necessary.
project.ext {
    // ... other variables
    mockitoVersion = '8.40.11'
}

dependencies {
    // .. other dependencies
    compile "org.mockito:mockito-all:mockitoVersion"
}
After that rerun the Gradle build command and make sure the file has been edited properly, then right click on the project folder in Eclipse, select Gradle > Refresh Gradle Project. You should now be able to use the package in your code. Remember to inform all other team members to refresh their Gradle Project when the commit is merged back into master.
Add external dependencies with care
Be mindful of the impact external dependencies can have on project build time and maintenance costs. Adding an external package should always be discussed with the other project members in the issue tracker.
7 Documentation#
Our documentation and user guides are written in GitHub Flavor Markdown with a number of extensions including tables, definition lists and warning blocks that help enable richer styling options for our documentation. These extensions are documented on the Extensions page of the Python Markdown package, the package we use to help transform the Markdown into HTML. We use HTML because it allows greater flexibility in styling and is generally more user friendly than raw Markdown. To set up the script:
- Make sure you have Python 3.5+ installed. Run
python3 --versionto check that it is installed correctly. - Install the dependencies -
pip3 install markdown pygments beautifulsoup4 - Run the script from the project root -
python3 docs/build/converter.py
7.1 Syntax Highlighting#
To get syntax highlighting for your code, use three backticks before and after your code without any additional indentation, and indicate the language on the opening backticks. This is also known as fenced code block.
For example,
public class YourCommand extends BaseCommand {
    // TODO: Define additional parameters here
    private Argument<Integer> index = new IntArgument("index").required();

    @Override
    protected Parameter[] getArguments() {
        // TODO: List all command argument objects inside this array
        return new Parameter[]{ index };
    }
}
is produced by
``` java
public class YourCommand extends BaseCommand {
    // TODO: Define additional parameters here
    private Argument<Integer> index = new IntArgument("index").required();

    @Override
    protected Parameter[] getArguments() {
        // TODO: List all command argument objects inside this array
        return new Parameter[]{ index };
    }
}
```
7.2 Admonition blocks#
To draw reader's attention to specific things of interest, use the admonition extension
Warning
This is an example of an admonition block
The syntax for this the block above is
!!! warning
    This is an example of an admonition block
warning is the style of the box, and also used by default as the title. To add a custom title, add the title after the style in quotation marks.
!!! warning "This is a block with a custom title"
    This is an example of an admonition block
The following styles are available
| Style | Color | Used for |
|---|---|---|
| note | Blue | Drawing reader's attention to specific points of interest |
| warning | Yellow | Warning the reader about something that may be harmful |
| danger | Red | A stronger warning to the reader about things they should not do |
| example | Green | Showing the reader an example of something, like a command in the user guide |
7.3 Captions#
To add a caption to a table, image or a piece of code, use the <figcaption> HTML tag.
<img src="..." alt="...">

<figcaption>
  The sequence of function calls resulting from the user input
  <code>execute 1</code>
</figcaption>
The document processor will automatically wrap the <figcaption> and the preceding element in a <figure> element and automatically add a count to it, producing the following code:
<figure>
  <img src="..." alt="...">

  <figcaption>
    <strong>Figure 2.</strong>
    The sequence of function calls resulting from the user input
    <code>execute 1</code>
  </figcaption>
</figure>
Note that Markdown is not processed inside HTML, so you must use HTML to write any additional inline markup you need inside the caption.
8 Appendix A : User Stories#
Priorities: High (must have) - * , Medium (nice to have) - , Low (unlikely to have) - *
| Priority | As a ... | I want to ... | So that I can... |
|---|---|---|---|
| *** | new user | see usage instructions | refer to instructions when I forget how to use the app |
| *** | user | add a new task | |
| *** | user | mark a task as complete | so I know which are the tasks are not complete. |
| *** | user | delete a task | remove entries that I no longer need |
| *** | user | edit a task | change or update details for the task |
| *** | user | set a deadline for a task | track down deadlines of my tasks |
| *** | user | set events with start and end dates | keep track of events that will happen |
| *** | user | view tasks | see all the tasks I have |
| *** | user | view incomplete tasks only | to know what are the tasks I have left to do. |
| *** | user with multiple computers | save the todo list file to a specific location | move the list to other computers |
| ** | user with a lot tasks | add tags to my tasks | organize my tasks |
| ** | user | set recurring tasks | do not need to repeatedly add tasks |
| ** | user | sort tasks by various parameters | organize my tasks and locate a task easily |
| ** | user | set reminders for a task | do not need to mentally track deadlines |
| * | user | know the number of tasks I have left | gauge how many tasks I have left to do. |
| * | user | be notified about upcoming deadlines without opening the app | so that I can receive timely reminders |
9 Appendix B : Use Cases#
(For all use cases below, the System is the TodoApp and the Actor is the user, unless specified otherwise)
9.1 Adding an event#
MSS
- User types out an event with start time, end time and location
- TodoApp adds event with specified fields and saves it to disk
Use case ends.
Extensions
1a. The task has no title
1a1. TodoApp shows an error message
Use case resumes at step 1
1b. The task's date field is empty
1b1. TodoApp creates a task with no start and end date
Use case resumes at step 2
1c. The task has a start time later than end time
1c1. TodoApp assumes the dates are inverted
Use case resumes at step 2
1d. The event's timing overlaps with an existing event's timing
1d1. TodoApp displays a warning to the user that he has another event at the same time
Use case resumes at step 2
9.2 Adding a task with deadline#
MSS
- User enters a task while specifying a deadline for the task.
- TodoApp creates new todo item with deadline specified and saves it to disk
Use case ends.
Extensions
1a. The task has no title
1a1. TodoApp shows an error message
Use case resumes at step 1
1b. The task's date field is empty
1b1. TodoApp creates a task with no deadline
Use case ends
9.3 Adding a recurring task#
MSS
- User enters a task with a recurring time period
- TodoApp creates a new recurring todo item with the specified time period
- At the start of the specified time period (eg. every week, month) TodoApp creates a copy of the original task for the user
Use case ends.
Extensions
2a. The given recurring time period is invalid
2a1. TodoApp shows an error message
Use case resumes at step 1
9.4 Marking a task complete#
MSS
- User requests to see a list of uncompleted tasks.
- TodoApp shows a list of uncompleted tasks.
- User marks complete a specific task in the list.
- TodoApp marks the task as complete by striking through the task and saving its new state to disk
Use case ends.
Extensions
1a. User uses another method to list tasks (e.g. search)
1a1. TodoApp shows the list of tasks requested
Use case resumes at step 2
2a. The list is empty
1a1. TodoApp informs the user the list is empty
Use case ends
3a. The given index is invalid
3a1. TodoApp shows an error message
Use case resumes at step 2
3b. The given index is a task which has already been completed
3b1. TodoApp informs the user the task has already been completed Use case ends
9.5 Delete task#
MSS
- User requests to delete a specific task from the list
- TodoApp deletes the person
Use case ends.
Extensions
1a. The given index is invalid
1a1. TodoApp shows an error message
Use case resumes at step 1
9.6 Viewing a specific tab (i.e. intelligent views)#
MSS
- User requests to view specific tab
- TodoApp shows a list of tasks under specific tab
Use case ends.
Extensions
1a. User enters invalid view (eg. a view that doesn't exist )
1a1. TodoApp shows an error message
Use case ends
9.7 Finding for a task#
MSS
- User searches for task with specific tag or fragmented title
- TodoApp returns a list of tasks matching search fragment
Use case ends.
Extensions
1a. User enters an invalid tag/search fragment
1a1. TodoApp returns an empty list
Use case ends
9.8 Editing a task#
- User searches for specific task to edit
- TodoApp returns list of tasks matching search query
- User edits specific task on the list, changing any of its fields
- TodoApp accepts changes, reflects them on the task and
Extensions
2a. List returned is empty
Use case ends
3a. User enters invalid task index
3a1. TodoApp shows error message indicating invalid index
Use case resumes at Step 2
3b. User enters invalid arguments to edit fields
3b1. TodoApp shows error message indicating invalid fields
Use case resumes at Step 2
9.9 Pinning a task#
MSS
- User searches for specific task to pin using the find command
- TodoApp returns a list of tasks matching the search query
- User selects a specific task to pin
- TodoApp pins selected task and updates the storage file on disk
Use case ends.
Extensions
2a. List returned by TodoApp is empty
Use case ends
3a. Selected task is already pinned
3a1. TodoApp unpins selected task Use case ends
3b. User provides an invalid index
3b1. TodoApp shows an error message
Use case resumes at Step 3
9.10 Undoing an action#
- User carries out a mutating command (see glossary)
- User finds they have made a mistake and instructs TodoApp to undo last action
- TodoApp rolls back the todolist to the previous state and updates the stored todolist on disk
Extensions
2a1. The user calls the undo command without having made any changes
2a1. TodoApp shows an error message
Use case ends
10 Appendix C : Non Functional Requirements#
The project should -
- work on any mainstream OS as long as it has Java 8 or higher installed.
- use a command line interface as the primary input mode
- have a customizable colour scheme.
- be able to hold up to 100 todos, events and deadlines.
- come with automated unit tests.
- have competitive performance with commands being executed within 5 seconds of typing into the CLI
- be open source.
11 Appendix D : Glossary#
- Mainstream OS
-
Windows, OS X
- Task
-
A single todo task, deadline or item
- Pinning
-
Marking a task with higher importance/priority than others. Pinned tasks will always appear first in any view.
- Mutating Command
-
Any command which causes a change in the state of the the TodoApp (E.g. add, delete, edit, pin, complete)
12 Appendix E : Product Survey#
Basic Todo Lists e.g. Sticky Notes, Notepad
Very flexible and easy to use, but hard to organise tasks on them. Also, data can only be saved locally.
Online/Cloud Based Todo lists
Apps such as Google Calendar, Asana and Trello offer a wide range of effective features that help manage your To-do lists. However, most of them require heavy mouse usage and the constant context switching might break user concentration. Our target audience are users who prefer not use the mouse at all, and that makes some of these applications almost unusable. Also, it is hard to sync without a constant internet connection.
13 Appendix F: Using Gradle#
Gradle is a build automation tool for Java projects. It can automate build-related tasks such as
- Running tests
- Managing library dependencies
- Analyzing code for style compliance
- Packaging code for release
The gradle configuration for this project is defined in the build script build.gradle.
Note
To learn more about gradle build scripts refer to Build Scripts Basics.
13.1 Running Gradle Commands#
To run a Gradle command, open a command window on the project folder and enter the Gradle command. Gradle commands look like this:
- On Windows :
gradlew <task1> <task2> ...e.g.gradlew clean allTests - On Mac/Linux:
./gradlew <task1> <task2>...e.g../gradlew clean allTests
Note
If you do not specify any tasks, Gradlew will run the default tasks clean headless allTests coverage
13.2 Cleaning the Project#
clean - Deletes the files created during the previous build tasks (e.g. files in the build folder).
e.g. ./gradlew clean
clean to force Gradle to execute a task
When running a Gradle task, Gradle will try to figure out if the task needs running at all. If Gradle determines that the output of the task will be same as the previous time, it will not run the task. For example, it will not build the JAR file again if the relevant source files have not changed since the last time the JAR file was built. If we want to force Gradle to run a task, we can combine that task with clean. Once the build files have been cleaned, Gradle has no way to determine if the output will be same as before, so it will be forced to execute the task.
13.3 Creating the JAR file#
shadowJar - Creates the addressbook.jar file in the build/jar folder, if the current file is outdated.
e.g. ./gradlew shadowJar
To force Gradle to create the JAR file even if the current one is up-to-date, you can 'clean' first.
e.g. ./gradlew clean shadowJar
Why do we create a fat JAR?
If we package only our own class files into the JAR file, it will not work properly unless the user has all the other JAR files (i.e. third party libraries) our classes depend on, which is rather inconvenient. Therefore, we package all dependencies into a single JAR files, creating what is also known as a fat JAR file. To create a fat JAR file, we use the shadow jar Gradle plugin.
13.4 Running Tests#
allTests - Runs all tests.
guiTests - Runs all tests in the guitests package
nonGuiTests - Runs all non-GUI tests in the seedu.address package
headless - Sets the test mode as headless. The mode is effective for that Gradle run only so it should be combined with other test tasks.
Here are some examples:
./gradlew headless allTests-- Runs all tests in headless mode./gradlew clean nonGuiTests-- Cleans the project and runs non-GUI tests
13.5 Updating Dependencies#
There is no need to run these Gradle tasks manually as they are called automatically by other relevant Gradle tasks.
compileJava - Checks whether the project has the required dependencies to compile and run the main program, and download any missing dependencies before compiling the classes.
See build.gradle > allprojects > dependencies > compile for the list of dependencies required.
compileTestJava - Checks whether the project has the required dependencies to perform testing, and download any missing dependencies before compiling the test classes.
See build.gradle > allprojects > dependencies > testCompile for the list of dependencies required.